搭建
- vitePress官网:
VitePress https://vitepress.vuejs.org/ - vitePress中文网文档:
VitePress中文网文档 https://vitejs.cn/vitepress/guide/getting-started.html
项目创建
- 新建一个文件夹(文件名可以自行取,但不建议叫
vitepress),进入该文件夹并初始化package.json文件。shyarn init - 本地安装
vitePress。shyarn add --dev vitepress - 根目录下新建一个
docs文件夹,进入文件夹新建一个index.md文档,输入内容。 - 修改
package.json文件,添加运行脚本。js{ // ..., "scripts": { "docs:dev": "vitepress dev docs", "docs:build": "vitepress build docs", "docs:serve": "vitepress serve docs" } } - 配置
.vitepress目录。所有VitePress相关的文件都将会被放在这里。创建配置文件.vitepress/config.js,导出一个JavaScript对象。jsmodule.exports = { title: 'Hello VitePress', description: 'Just playing around.' }这部分会在 『配置文件配置』 模块详细介绍。
- 运行sh
yarn docs:dev
现在能够运行成功,打开页面能够看到效果了。但是这远远不够我们的预期,需要做进一步的调整。
目录结构
作为新手梳理一遍目录结构还是有必要的,比较心急想要尽快实现效果的话可以 『跳过』 本段,从下一段 『首页配置』 开始。
├── docs
│   ├── .vitepress
│   │   ├── theme
│   │   │   ├── custom.styl
│   │   │   └── index.js
│   │   ├── config.js
|   ├── public
│   └── index.md
│   ├── learn
│   │   ├── HTML.md
│   ├── project
│   │   ├── Music.md
└── package.json
下面一一讲解。
docs/.vitepress: 用于存放全局的配置。docs/.vitepress/theme: 用于存放本地主题。docs/.vitepress/theme/custom.styl: 用于定义自定义css样式。docs/.vitepress/theme/index.js: 将自定义css样式抛出。docs/.vitepress/config.js: 配置文件的入口文件,用于设置博客的导航栏、侧边栏等属性,是重点文件。docs/public: 静态资源目录。docs/index.md: 博客首页文件,用户打开博客第一眼看到的是index.md的内容。
首页配置
修改 docs/index.md 的内容,想要先看效果的话可直接复制以下代码。
---
layout: home

hero:
  name: tydumpling博客
  text: 欢迎来到tydumpling博客,我是tydumpling。                                     这里记录自己的学习成果,项目学习经验。不定时更新~
  tagline: 每天都要比昨天更有进步💪
  actions:
    - theme: brand
      text: 前端知识
      link: /CSS/
    - theme: alt
      text: 项目总结
      link: /project/Music/
    - theme: alt
      text: 测试按钮2
      link: /business/index

features:
  - icon: 📕
    title: 学习之旅
    details: 自学成果
    link: /CSS/
  - icon: ⚡
    title: 项目之旅
    details: 项目总结
  - icon:  ⌛
    title: 博客部署
    details: 从0到1部署博客
    link: /vitePress/
  - icon:  🎈️
    title: 未完待续
    details: 尽情期待
---下面一一介绍。注意前置要求,需要根据自己配置的路径配置对应的文件和文件夹。例如上方的示例代码,/CSS/ 需要在 docs 文件创建 CSS.md 文档。其他以此类推。
第一步最主要的,是把代码包裹在
---内,如上方代码所示。layout: home,表明该index.md文件是首页。注:
vuePress声明首页的方式不一样,不要搞混淆了。hero:重点模块之一,主要用于设置首页的大标题、介绍、小标题以及按钮。name:首页大标题。text:首页介绍。tagline:首页小标题。actions:首页按钮组,用-隔开,一个-代表一个按钮。theme:按钮样式类名text:按钮文本。link:点击后跳转的页面。
features:重点模块之一,用于设置底部专栏,一个-代表一个专栏。icon: 专栏左上角图标(可选)title: 专栏标题details: 专栏简介link: 点击后跳转页面的路由。可选,不设置的话鼠标悬停没有特殊样式,没有点击事件。
配置文件配置
修改 docs/.vitepress/config.js 的内容,老规矩,先放总体代码,想先看效果的可以复制粘贴。后面对每项进行详细介绍。
module.exports = {
  // 网站标题
  title: '🔪 tydumpling博客',
  base: '/tydumpling/',
  // 网站描述
  description: 'tydumpling博客',
  // 打包目录
  dest: './dist',
  head: [
    // 添加图标
    ['link', { rel: 'icon', href: '/favicon.ico' }],
    ['meta', { property: 'og:title', content: 'tydumpling博客' }],
    ['meta', { property: 'og:site_name', content: 'tydumpling博客' }],
    ['meta', { property: 'og:type', content: 'website' }],
    ['meta', { property: 'og:description', content: '前端教程' }],
    ['meta', { property: 'og:url', content: 'https://tydumpling.github.io/tydumpling/' }],
  ],
  // 使用插件
  plugins: [
    '@vuepress/active-header-links', // 页面滚动时自动激活侧边栏链接的插件
    '@vuepress/back-to-top', // 返回顶部插件
    '@vuepress/medium-zoom', // 图片预览插件
    '@vuepress/nprogress', // 页面顶部进度条
  ],
  // 主题配置
  themeConfig: {
    // 获取每个文件最后一次 git 提交的 UNIX 时间戳(ms),同时它将以合适的日期格式显示在每一页的底部
    lastUpdated: '最近更新', // string | boolean
    // 启动页面丝滑滚动
    smoothScroll: true,
    // 头部导航栏配置
    nav: [
      {
        text: '前端知识',
        items: [
          { text: 'CSS', link: '/CSS/' },
        ],
      },
      {
        text: '前端项目',
        items: [
          { text: 'Music', link: '/project/Music/' },
        ],
      },
    ],
    // 左侧导航栏
    sidebar: {
      '/learn': getLearnSidebar(),
    },
    // 社交链接
    socialLinks: [
      { icon: 'github', link: 'https://github.com/tydumpling' }
    ],
    // 页脚
    footer: {
      copyright: 'Copyright © 2023-present tydumpling',
    },
  }
}

// 获取前端的数组
function getLearnSidebar() {
  return [
    {
      text: 'CSS',

      items: [
        { text: '基础', link: '/CSS/' },
      ]
    },
  ]
}
基础建设
config.js 是博客的配置文件,需要导出一个对象。
其中:
title:博客网址标题。base:项目打包的根路径。这点会在 『部署』 章节详细介绍。description:博客网址描述。titleTemplate:标题的模板。dest:打包的位置,下方代码表示打包在config.js文件同级目录的dist文件夹下。head:网站的头部信息,包括网站ico图标和其他信息。下图为打包后的
index.html文件。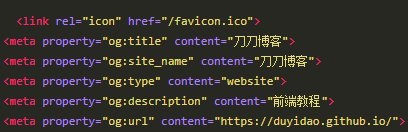
module.exports = {
  // 网站标题
  title: '🔪 tydumpling博客',
  base: '/tydumpling/',
  // 网站描述
  description: 'tydumpling博客',
  // 打包目录
  dest: './dist',
  head: [
    // 添加图标
    ['link', { rel: 'icon', href: '/favicon.ico' }],
    ['meta', { property: 'og:title', content: 'tydumpling博客' }],
    ['meta', { property: 'og:site_name', content: 'tydumpling博客' }],
    ['meta', { property: 'og:type', content: 'website' }],
    ['meta', { property: 'og:description', content: '前端教程' }],
    ['meta', { property: 'og:url', content: 'https://tydumpling.github.io/tydumpling/' }],
  ]
}
使用插件
正如和 vue-cli 一样,生态环境中的插件,也有着很重要的地位,我们来安装下官方的插件,为 vitePress 添加更多的功能。
module.exports = {
  // ...,
  plugins: [
    '@vuepress/active-header-links', // 页面滚动时自动激活侧边栏链接的插件
    '@vuepress/back-to-top', // 返回顶部插件
    '@vuepress/medium-zoom', // 图片预览插件
    '@vuepress/nprogress', // 页面顶部进度条
  ],
}
更多插件可以浏览
主题配置
自定义主题
logo:siteTitle:outlineTitle:outline:smoothScroll:启动页面丝滑滚动。
module.exports = {
  // ...,
  themeConfig: {
    logo: '/logo.svg',
    siteTitle: '『 tydumpling博客 』',
    outlineTitle: '🔴🟠🟡🟢🔵🟣🟤⚫⚪',
    outline: [2, 6],
    // 启动页面丝滑滚动
    smoothScroll: true
  }
}
头部导航栏
themeConfig 对象中为 nav 属性赋值一个数组对象,每一个对象是一个导航栏模块。
module.exports = {
  // ...,
  themeConfig: {
    // ...,
    nav: [
      { text: '掘金', link: 'https://juejin.cn/user/1855631359481847/posts' },
      {
        text: '💻 前端知识',
        items: [
          { text: '🟧 HTML', link: '/learn/HTML/' },
          { text: '🟥 CSS', link: '/learn/CSS/' },
          { text: '🟨 JavaScript', link: '/learn/JavaScript/' },
          { text: '🟦 TypeScript', link: '/learn/TypeScript/' },
          { text: '🟩 Vue', link: '/learn/Vue/' }
        ],
      }
    ]
  }
}text为该导航的标题link为点击后跳转的路由items为该导航模块的二级导航,数组的形式,每一个对象为一个二级导航。同样通过设置text和link实现效果。
左侧导航栏
themeConfig 对象中为 sidebar 对象赋值一个数组,该数组中每一个对象是一个导航栏模块。
module.exports = {
  // ...,
  themeConfig: {
    // ...,
    nav: [],
    sidebar: {
      '/': getSidebar()
    }
  }
}

function getLearnSidebar() {
  return [
    {
      text: 'HTML',

      items: [
        { text: '基础', link: '/learn/HTML/' },
        { text: '进阶', link: '/learn/HTML/advanced' },
      ]
    },
    {
      text: 'CSS',

      items: [
        { text: '基础', link: '/learn/CSS/' },
        { text: '进阶', link: '/learn/CSS/advanced' },
      ]
    },
    {
      text: 'Javascript',

      items: [
        { text: '基础', link: '/learn/Javascript/' },
        { text: '进阶', link: '/learn/Javascript/advanced' },
      ]
    },
    {
      text: 'Vue',

      items: [
        { text: '基础', link: '/learn/Vue/' },
        { text: '进阶', link: '/learn/Vue/advanced' },
      ]
    }
  ]
}
其中:
sidebar对象内左侧为该导航模块的父级路由,/表示同一目录下的同级文件夹。text为该模块的标题collapsible为true时表示该模块可以收起items为该模块的子模块,以数组对象的形式赋值
具体效果如下图所示。 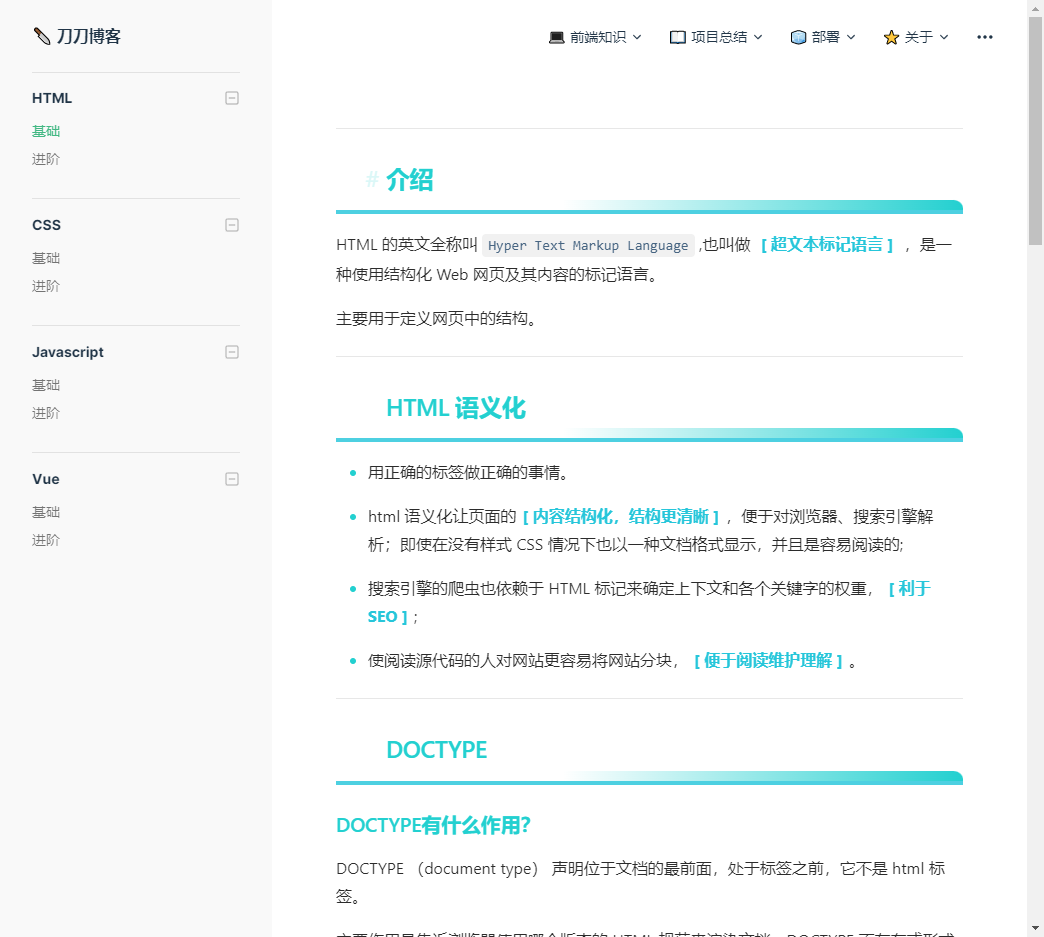
此时点击左侧导航跳转到404页面是正常的,因为路由导航设置好了,但是页面还没写好(就像你和别人说了一个地址,但是那个地址还没开发好,别人去了也是一片荒地)。
路由配置以 docs 文件夹为基准路径,如:
/learn/HTML/表示在docs文佳佳下创建一个learn文件夹,进入该文件夹创建一个HTML文件夹,再进入该文件夹创建一个index.md文件(斜杆后面不写表示省略index)/learn/HTML/know表示在docs文佳佳下创建一个learn文件夹,进入该文件夹创建一个HTML文件夹,再进入该文件夹创建一个know.md文件(除了index外其余文件名都不可省略)
后续有一种场景:我后续想要开一个新的模块,不与这些模块一起展示,该怎么做呢?
答案:往
sidebar对象继续设置新的模块,设置新的导航模块,如'/learn/',再docs文件夹下创建一个learn文件夹即可,如下方代码和截图所示。
module.exports = {
  // ...,
  // 主题配置
  themeConfig: {
    nav: [],
    // 左侧导航栏
    sidebar: {
      '/learn': getLearnSidebar(),
      '/project': getProjectSidebar()
    }
  }
}

// 获取前端的数组
function getLearnSidebar() {
  return [
    {
      text: 'HTML',

      items: [
        { text: '基础', link: '/learn/HTML/' },
        { text: '进阶', link: '/learn/HTML/advanced' },
      ]
    },
    {
      text: 'CSS',

      items: [
        { text: '基础', link: '/learn/CSS/' },
        { text: '进阶', link: '/learn/CSS/advanced' },
      ]
    }
  ]
}

// 获取项目的数组
function getProjectSidebar() {
  return [
    {
      text: '📖 项目笔记',

      items: [
        { text: '🎶 音果云音', link: '/project/Music/' },
        { text: '🛒 视频分销', link: '/project/Sale/' },
        {
          text: '🔎 CRM',
          link: '/project/CRM/',
        },
      ],
    }
  ]
}
现在划分为 learn 和 project 两个模块了。
页面编写
页面编写实际上就是写 markdown 语法,这里不做过多赘述,想要了解更多的可去知乎、CSDN等平台寻找。
这里主要说的一点是 Front Matter ,它其实就是对当前 .md 的声明。有点类似于 HTML 文件中的 meta 标签的定位。
书写要求:写在 --- 内。
---
title HTML 进阶   // 当前页面的标题
lang en-US       // 当前页面的语言 可多语言,默认英语
description      // 当前页面的描述
layout           // 设置当前页面的布局组件
---
样式设置
默认样式太丑陋?可在 docs/.vitepress/theme 文件夹下新建一个 css 文件(或者下载 less 、sass 、stylus 等预处理器也可以)设置样式。
样式设置完毕后刷新页面不生效,不要急,步骤还没结束,在同级目录下(也就是 docs/.vitepress/theme 文件夹下)新建一个 index.js 文件,引入设置好的样式并导出,如下方代码所示。
import DefaultTheme from 'vitepress/theme'

import './custom.styl'

// 自己的css文件名

export default DefaultTheme
知识点拓展
路由
在 Vue 中,一个 .vue 文件就可以作为一张页面,或者是一个组件。
在 vitePress 中,一个 .md 文件就可以作为一张页面。
并且,根据根目录 docs ,可自动生成路由。
├── docs
│   ├── HTML
│   │   ├── index.md     /HTML/
│   └── └── advanced.md     /HTML/advanced/
└──
总结
到目前为止,博客初步搭建工作完成了,总结一下做了哪些内容:
- 在
docs/index.md首页文件中编写博客的首页,包括标题、简介、小言、按钮、专栏等。 - 在
docs/.vitepress/config.js文件中配置博客的标题、介绍、顶部导航、左侧导航等。 - 在
docs/.vitepress/theme文件夹中设置博客样式并导出使用。
Contributors
 Yuan Tang